Quantcast
Channel: AskME4Tech blogs
Viewing all 85 articles
Browse latest View live

Deploy HYPER-V Failover Cluster in Windows Server 2012 - Part 2

$
0
0

Today i will continue with the Second and Last Part in HYPER-V Failover Clustering. Use these 2 technologies together to make High Available your Virtual Machines and keep downtime out of the game. In Firs Part i have describe how can enable Failover Clustering , use Validation Wizard and add the nodes that will be act as Clusters.

Today i will describe the following

  • Add Storage in Failover Clustering. 
  • Create VM in Failover Clustering.
  • Enable High Availability for the Virtual Machine
  • Test Failover Clustering.

We have lot to write so let's start.

Before start to read the article must already read and understand the

Deploy HYPER-V Failover Cluster in Windows Server 2012 - Part 1


Add Storage in Failover Clustering. 

Now the first step is to add the Storage that will be use with Clusters to create the Virtual Machines. Remember that the Storage:  

  • You must use Share Storage that is attached in Windows Server 2012 and not Local Storage of your Server.
  • Attach Storage should contain multiple, separate disks (logical unit numbers, or LUNs) that are configured at the hardware level.

So after have setup your Share Storage like SAN or any NAS base on your requirements we can start

  • Open Server Manager and go Tools - - -> iSCSI Initiator.
  • Click in Discovery Tab.
  • Click in Discovery Portal.

  • Type the Ip Address of your Share Storage and click OK.

  • Go in Tab Targets and you will see the available targets  base on what you have create in your Share Storage.
  • Clik in target that you have create and select Connect. As you can see in image what i have create for this scenario.

  • Click Enable Multipath and any other settings base on your Vendor documentation from Share Storage.

  • Go in Disk Management and you will see the new Disk tha you have add.
  • Right click in Disk and select Online.

  • Right click in the Partition and select Initialize.
  • Select GPT or MBT base on your requirement and click Next.
  • You don't need to change anything click Next and Next to start Formatting the Disk.
  • Do the same steps from the beginning in second HYPERV.
  • When you finish open Failover Clustering
  • Expand Storage and click Disks.
  • Click Add Disk from the right side.

  • Select the Disk that you want to Add and click OK.

  • Now you can see the Disk . If you see in Assign To the status is Available Storage

  • Until now i have add the disk in Cluster but only the specific node can see the Disk. I must proceed to Share the Storage to have read-write access multiple nodes in the same LUN like here.
  • Right click in the Cluster Disk and select Add to Cluster Shared Volumes.

  • If you check now in the Assign to will see that the status is Cluster Shared Volume.

Until now we have add the Storage in Failover Clustering and all the nodes of the Clustering can see the Share Storage. One thing that has change is the location of the Storage. If you open My Computer you will not find any new Partition. The Partition you will find it in C:\ClusterStorage.

Create VM in Failover Clustering.

After Add the Storage in Failover Clustering it's time to create new VM in Share Storage. I wrote an article to explain how can create Virtual Machine in Create Virtual Machine in Windows 8.1 with HYPER-V but in any case i will repeat the steps.

  • From the Failover Clustering Console click Roles and from the right side click Virtual Machines - - > New Virtual Machine.

  • For the First Step of Wizard  Before you Begin just click Next.

  • Write the name for the VM that you want and check Store the Virtual Machine in different location. Click Browse and find the C:\ClusterStorage\Volume1. Because i like to have clean structure i create a Folder with the name of the VM. Click Next.

  • Select Generation 1 or 2 base on your requirements.Click Next

  • Add the RAM that you want to has the Virtual Machine.

  • Select the Network Adapter if you have createed in HYPER-V. Unless leave it Not Connected and you will create after the Network Adapter. Click Next

  • Type the size for the virtual hard disk. Click Next.

  • Select install an Operating System later. Click Finish.

  • Find the new Virtual Machine in Failover Cluster Manager.


Now we create the Virtual Machine .It's time to configure it for High Availability. If choose to leave it as it in case that the node bring offline then the Virtual Machine also will be offline. So it's necessary the following step to take advantage of the Clustering.

Enable High Availability for the Virtual Machine

Let's start to Configure Role for High Availability in VM.

  • From Failover Cluster Manager select Roles
  • Click Configure Roles from the right side.

  • In the Before you Begin of the High Availability Wizard click Next.

  • Find and Select Virtual Machines of the Roles that included. Click Next.

  • Select the Virtual Machine that you want to configure it for High Availability. Click Next.

  • Just a Confirmtion Page for the Configuration until now. Click Next.

  • Click Finish.

So now we have configure the Virtual Machine for High Availability. The last Step is to test if all he Configuration that we have done works without problems.

Test Failover Clustering.

This is the last and the most important step. Before start to use Failove Clustering in production enviroment first must test if works.

  • From Failover Cluster Manager select  Nodes and you will see all the available Nodes that you have which is  UP or DOWN.
  • Select Roles and identify the Owner of the Virtual Machine.

  • Restart the owner node of the Virtual Machine and go in Roles to check what will happen in Virtual Machine that you have create.
  • If everything is working properly then it will start the Live Migration and you will see the status in Information field. With the Live Migration the Virtual Machine will be transfered in available node and continue to be Online without any downtime. As you can see the Owner is the HYPERV2 now.

  • If  the VM bring offline then must be check all the configuration because probably has misconfiguration. 
  • With the same way test and the other node.

If everything working properly then you are ready to go Live with the Failover Clustering and create High Availability Solution in your enviroment. Failover Clustering can save you from a lot and critical problems and keep your enviroment without downtimes.

Do you want to share your experience. Write in our commented system and share it with other IT Pro.

Have a nice weekend!!


How to Delegate Access in HYPER-V Management Console

$
0
0

In medium/large organization with IT Department and not alone IT every IT has specific responsibilities and specific access in different areas.

Since Windows Server 2012 has create a new Group in Active Directory as HYPER-V Administrators sometimes maybe requested different level access in HYPER-V Management Console from different Administrators. 

Today i will explain how can give specific access in HYPER-V Management Console for specific Administrators.

So let's start


  • Open the Start Menu and type Azman.msc
  • Right Click in Authorization manager and select Open Authorization Store

  • Click Browse and go in C:\ProgramData\Microsoft\Windows\Hyper-V and select the InitialStore.xml. Click OK

  • Expand HYPER-V Services - - > Definitions.Right Click in Role Definition and select New Role Definition.
  • Type a Name. I type Basic Access for these scenario. Click OK

  • Now you can see the new Role in the right side.
  • Right clikck in Task Definitions and select New Task Definition.
  • Type the name. I type Basic. Click OK.

  • You can see the new Task Definition in the right side.
  • To add Definitions into Task double click in Basic Definition and select Tab Definitions.
  • Click Add button and select Tab Operations.

  • Select the Operations that you want to allow for the specific Definition. I will check only Start Virtual Machine. Click OK and OK.

  • Now i must add the Task Definition into Role Definition.
  • Click in Role Definitions. Double click in Basic Access. Select Tab Definitions.
  • Click Add Button. Select Tab Tasks, check the Basic Task. It's the Task that create before. Clicl OK and OK.

  • Now we must assign a Role in the appropriate User or Group.
  • So Right click in Role Assignments and select New Role Assignment.

  • Check the Role Definition that you want to add and click OK. I check Basic Access.

  • Right click in Basic Access and select Assign Users and Groups, select From Windows and Active Directory.
  • In the Select Users and Groups type the user or Group that you want to has the specific access and click OK.

  • I recommend to use Security Groups because if in the future need another user the same access then the only that you have do is to add in the specific Security Group.
  • So i have create a new Security Group Hyper-v Basic Access. and add the user that you want to has the specific access. For the scenario add the user1.
  • After that login with the user that have select to be a memeber in the specific Group and check the permissions.

This feature it's very helpfull in big IT Departments that has multiple System Addministrators or in IT Departments with at least 2 IT and you don't want to give full access in HYPER-V for the System Administrator.

Do you know this feature? Write your feedback, experience or comment and share it with other IT Pro in our commented system.

Have a nice weekend !!!

New Version of Powershell Tool Export Reports from Active Directory

$
0
0

After feedbacks from users for the specific tool i decide to update with new version that include new featires.So I would like to announce the new version of Powershell Tool - Export Reports from Active Directory. This version include the option to select from specific Organization Unit to export Reports. 

It's very easy and you don't need to be expert to use the Tool.

Below i will explain how can use the new feature.

When you will open the Tool you can see the option which say Select Organization Unit.

  • Check the Select Organization Unit and check the Report that you want to Export.
  • Click browse and in the right side will open the structure of your Active Directory with all Organization Units.

  • Select the Organization Unit and clcik Export.
  • Save the file.

You can download here

That's it!!!

Quick and Simple.

Give use your feedback through our commented system or send me an email in info@askme4tech.com.


Useful Powershell Commands that can use it every day

$
0
0

Today i would like to publish some useful powershell commands that can use it at daily tasks and get quick your info that need.

Some of these commands already have publish in previous articles but it's better to have it central in one place instead to search articles to find what you want.

The specific Article i will keep it up to date and add commands as often it's possible. 

I want to create a central base that everyone can find quick and easy commands that need the specific time. 

Any feedback or recommendation will be accepted to improve the functionality and search of the article.

Now Let's take a look in the first commands of the Article.


Exchange Server

Use Exchange Management Shell

Get all users that are in Litigation Hold and Size of Recoverable Items, Purge, Deletions and Versions

Get-Mailbox -ResultSize Unlimited -Filter {LitigationHoldEnabled -eq $true} | Get-MailboxFolder Statistics -FolderScope RecoverableItems | Format-Table Identity,FolderAndSubfolderSize –Auto


Workstations or Servers Info

Retrieve Hard Disk info from Remote PC

Get-CIMInstance Win32_Logicaldisk -filter "deviceid='C:'" -Computer <computername>


Retrieve  CPU Type info from Remote PC 

Get-CIMInstance Win32_processor  -Computer <computername>


Retrieve  RAM info from Remote PC 

Get-CIMInstance Win32_physicalmemory  -Computer <computername>


View all the processes from remote PC

Invoke-Command -Computername <computername1,computername2> -ScriptBlock { Get-Process }


Active Directory Users Info

Get Name Email Address and Title  from all users in Active Directory

Get Display Name Email Address and Title for all users in Active Directory


Get Usernames from all users in Active Directory

Get-ADUser -Filter * -Properties userprincipalName | select userprincipalName

Have a nice Weekend!!

Write your feedback, experience or comment and share it with other IT Pro in our commented system.


Install and Configure DFS Replication in Windows Server 2012

$
0
0

DFS Replication is a Role of Windows Server that can use it to replicate File Servers across LAN or Internet.

DFS (Distributed File System) Replication use a compression algorithm as remote differential compression (RDC) to replicate only the changes in file block instead of the entire file. If you need more details you can find in Technet https://technet.microsoft.com/en-us/library/jj127250(v=ws.11).aspx.

Last month i face an issue while try to migrate my File Server from Esxi to HYPERV. File Server is almost 1.5 TB and i didn't have any tool to copy all my files or full VM through weekend in new HYPERV Host.

My backup is for Esxi , my replication the same. I try to use MVMC to convert the VM but the time wasn't enough to complete thought weekend. 

Robocopy it's very good solution but i see that the time wasn't enough to transfer 1.5 TB include millions of files. So what must i do to resolve this problem? 

DFS Replication was the best solution in this scenario and not only. So today i would like to share and explain how can install and configure DFS Role to Replicate your File Servers.


Install Role of DFS Replication

First thing is to install the DFS Replication Role in every Windows Server that you want to Replicate. In this Scenario we have 2 File Servers for Replication. (FILESERVER and FILESERVER-HV) and 1 Domain Controller


  • Open Server Manager
  • Select Manage - - > Add Roles & Features
  • In the first screen click Next.

  • Leave the Role-base or Feature-based installation and click Next.

  • Leave the deafult options and click Next.

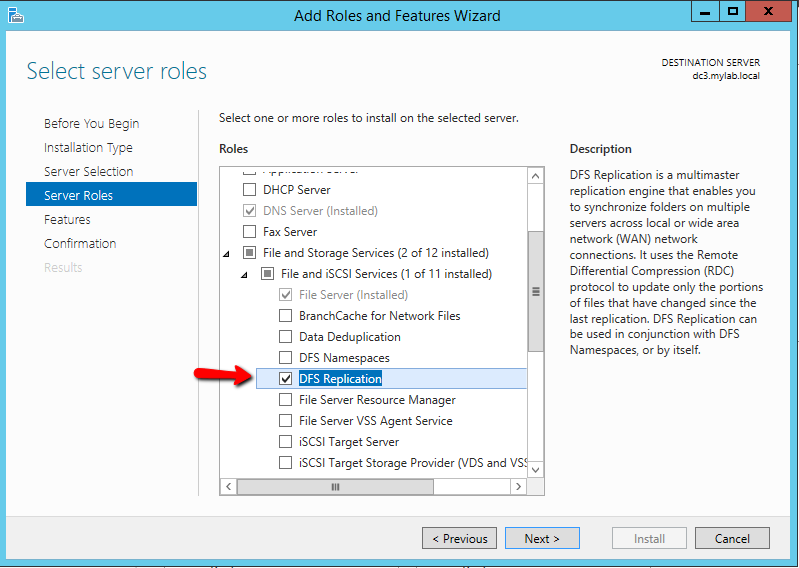
  • Expand File Storage Services - - > File & iSCSI Services and check DFS Replication.
  • Click Add Features to return in first screen and click Next.

  • Click Install and wait to finish the Installation.

Create new Replication Group

After finish the installation go back in Server Manager and select Tools - - > DFS Management.

  • Right Click in Replication and select New Replication Group.

  • Because we have only 2 Servers will select the second options Replication group for data collection.

  • Click Next. Type the name of the Replication group and click Next.

  • Click Browse to find the source server. Click Next.

  • Click Browse to select the folder that you want to replicate and click Ok.

  • Now clcik Browse to select the destination Server. Click Next.

  • Select the target folder. But be carefull you don't need to create the root folder in the destination because if select the target folder User as in example will be create the Path E:\Users\Users. We don't want this. Just select the one level before and the replication will be create the Folder. Click Next.

  • Select if will be replicate continuously or schedule when start and finish the Replication. In production enviroment with large Folders it's better to schedule the replication in  non working hours. But now i will select Replicate continuously. You can configure the Bandwith but we don't want it. Just keep it Full.

  • Just a confirmation of your settings. Click Create.

  • Wait to create the Replication Group.

Configure Replication

After create the Replication Group it's very important to configure some settings for better perfomance.

  • From the console of DFS Management click in Replication and  you will see the new Group.
  • If you click on the Group in the right side you will see four  Tabs and the Staging Quota in 4 GB. What is Staging Quota? DFS Replication uses staging folders for each replicated folder to act as caches for new and changed files that are ready to be replicated from sending members to receiving members. These files are stored under the local path of the replicated folder in the DfsrPrivate\Staging folder

  • Let's start with the Membership Tab.
  • Go down in Replicated Folders, right click one of them and select Properties.
  • Click in Tab Staging and click in Quota. The default is 4 GB. The Staging is one of the most important settings because you can avoid perfomance issue in replication. 
  • In large folders it's recommended to change staging Quota more than 4 GB. How can calculate what is the better settings for your enviroment?
  • Just go in https://technet.microsoft.com/library/dn465158.aspx and read carefull how can optimize the staging.
  • After understand and find what is your right quota for your enviroment , change it and click OK.

  • In Connection Tab with right click in one of the Members you can Disable the Replication or force the Replication Now.

  • In Tab Replication Folders you must configure another one important setting. Right click in folder and select Properties.
  • In File filter you can see default values the .bak,.tmp extension of files. This means that these types of Files will not be replicated.

  • In case that you have these types of Files you must remove it. Unless the replication will be work properly but the folders will not be replicated with all the files. Also you can use it to exclude file types of your replication.
  • In the Tab Delegation you can see How the permissions granted. It's better to don't change anything here.


After that wait to Replicate all the folders from one server to another. If you have large folders must wait hours and maybe days for the first Replication. It's the only disadvantage that i can find in this feature. I will continue to explan DFS Replication with new Articles to explain more features and also how can use it with Powershell.

I hope this week to find something intresting.

Have a nice weekend!!

Now it's your turn to tell us your experience and any issue that you have face with DFS Replication in our commented system.

How can monitoring DFS Replication in Windows Server 2012

$
0
0

DFS Replication it's a great future to use it in your File Servers and Replicate them in LAN or WAN. Why not  include this technology in your Disaster Recovery Plan . My Last Article Install and Configure DFS Replication in Windows Server 2012 explain how can install DFS Replication Role and Configure Replication between 2 Servers. 

In this article i would like to explain how can monitoring Health Status of DFS Replication , files that are replicated or not and what are supported limits of DFS Replication.

So let's s start !!

Supported limits of DFS Replication

Base on Microsoft in https://technet.microsoft.com/library/cc773238.aspx#BKMK_00 for the Windows Server 2012 R2 the limits are:

  • Size of all replicated files on a server: 100 terabytes.
  • Number of replicated files on a volume: 70 million.
  • Maximum file size: 250 gigabytes.

So if you have File Server with more than the below guideline then it's better to use another solution for your Replication.

Check Health Status of DFS Replication

After create Replication how can check Health and effectively of your Replications in Memeber Servers. Follow the steps to create Reports that can give you inf


  • Open DFS Management.
  • Expand Replication and Select the Group that you want to create the Report.
  • From the right side click Create Diagnostic Report.

  • Select the first option Health Report and click Next.

  • Select the path that you want to extract the Report or leave the Default. Click Next.

  • All the Server are in Include Members. If you want to create Diagnostic Report for specific Server select the Server and click Remove. Click Next.

  • I will leave the option Yes, count backlogged files in this Report. Be carefully with the Reference Member. Must be the Server that has the most update files. Click Next.

  • Just a review of your settings. Click Create and wait until finish the Report.

  • When the report finish will open an Internet Explorer with the Results. Or go in C:\DfsReports (Default Path) or in any other Path if has change it while run the Wizard.
  • Now what we have here.

After some info like Replication Group, Reference Member and more it has interesting results like

ERRORS

Here you can see a simple explanation of the Errors

WARNING

Here you can see a simple explanation of the Warnings

SERVERS UNAVAILABLE FOR REPORTING

If any Server is Unavailable in the Specific Report.

SERVERS DETAILS

Detail Explanation of Errors and Warnings that found per Server.


  • Expand the ERRORS to see in which Server has Errors  and click View Server Details.
  • The most important info are in SERVER DETAILS because include all the info from the above Options and details for every ERROR or WARNING.
  • Expand SERVER DETAILS and the Server Name which has Errors.
  • As we can see here in my Report i have some sharing violations for 176 files in 1 folder. 
  • If you Expand the ... Replicated Folder you can see the first 100 Files that hasn't Replicated because of sharing Violations.

  • With the same way you can check and the WARNINGS.

Health Report include some good info for the Replications but it's not the Report that can cover you if you would like to know exactly what's going on. 

In the following section i will explain suggested ways that can use for better controlling and monitoring in DFS Replication.

Monitoring files that are replicated or not

  1. Health Report

As explain in previous Section with Health Reports you can get ERRORS and WARNINGS for the Replication between Members. Read the previous section <<Check Health Status of DFS Replication>> to understand how can use it.

  1. Backlog Files Report

If you would like to get a Report only for the Files that aren't replicated you can use the following command in Powershell 

Get-DfsrBacklog -GroupName "GroupName" -FolderName "FolderName" -SourceComputerName "SourceComputerName" -DestinationComputerName "DestinationComputerName"–Verbose

This will be the Output with lot of details that can use to resolve replication issues.

Or go in https://technet.microsoft.com/en-us/library/dn296583.aspx to find more details.

  1. Use the Event Logs to identify Warnings and Errors .

Logs files of DFS Replication can find it in Application and Services Logs. If you expand it you can see specific file for Logs of DFS Replication. There find general Errors of Staging , Communication between Member Servers, when Replication start and stop but you can't see errors for Files that aren't Replicated.


These are some of the recommended ways to use and identify different problem of DFS Replication. Unfortunately Microsoft don't has a good Monitoring or Report Solution for DFS. But if you use these ways you can have a good feedback for what is going on in your DF Replication.

Have a nice Weekend!!

Are you familiar with DFS Replication. Do you have face errors ? Share your experience in our commented system and get opinion or solution from other IT Pro.


How to Restore Windows Image Backup in Different Windows Server

$
0
0

Windows Backup it's a feature of Windows Server that can use it for basic requirements. Windows Backup take a System Image of your Server and you can't Restore individual files but the full Server. 

I decide to write this Article because i would like to share with you how can use Windows Backup and Restore it in different Server when you don't have any other option.

Let's take a look in my Scenario. I am in progress to convert my Servers from Esxi to HYPERV. I have one Server with Sql Server, ERP Application and lot of customization. I can't Restore Backup because my Backup Software it takes backups from Esxi. I can't install new Windows Server in HYPERV and migrate it because has configurations in database and in ERP that has be done from ERP Company. 

I have 2 solutions.

  1. Wait ERP Company to do all the installations and configurations from the beginning in new Server with extra cost.
  2. Use Windows Backup and Restore it in Windows Server.

I will follow the second solution because it's faster and without cost. 

So let's start !!!

Install Windows Server Backup Feature

  • Select Manage - - > Add Roles and Features.
  • Click Next in the first Screen of Setup Wizard (Before you Begin).

  • Select Role-based or feature-based installation.

  • Leave the default settings and click Next.

  • In Server Roles Click Next without add any Role

.

  • Go down , check the Windows Server Backup and click Next.

  • Click Install and Wait to finish the Installation   

Backup the Server with Windows Server Backup

  • After finish the installation go back in Server Manager and click Tools - - > Windows Server Backup.

  • Click Local Backup and from the right side select Backup Once or Backup Schedule if you want to Schedule your Backup.
  • Base on the scenario we use Backup Once.
  • Click Backup once.

  • Leave the Default Options and click Next.

​​

  • Of course will proceed with Full Server Backup. Click Next.

  • Select Remote Share Folder and click Next.

  • Specify the Location of your Remote Share Folder and in Access Control select Inherit to has access in backup everybody which can access in Remote Folder. For this scenario i choose this option.
  • But if you use Windows Backup daily as your Backup soution it's recommended to select the first option. Click Next.

  • Click Backup.

  • Wait to finish. The time that need is base on the Windows Server storage size.


Restore Windows Server Image in Different Server.

If you want to Restore Windows Backup in the same Server the process it's simple. Open Windows Server Backup click from the right side Restore and follow the Wizard.

The only thing that must remember is that when specify the Location of the Windows Backup must be the root folder. For example if you have take backup in \\192.168.10.5\backups then you must specify the same folder and not the WindowsImageBackup folder which created after  the Backup completed.

Because in our Scenario will try to restore the Window Backup in  Different Windows it's more complicated. So let's start

  • Create a new Virtual Machine in HYPERV or Read the article Create Virtual Machine in Windows 8,1 with HYPER-V .
  • If the VM is Generation 1 then after create the VM must delete the Network Adapter and create a new Legacy Network Adapter. The reason is because Legacy Network Adapter can work without installing the network drivers.
    If you keep the Network Adapter when you  try to Recover the Server can't connect to the network.because will not has drivers for network card to connect and restore the Backup.
  • So go in Settings of then Virtual Machine delete the Network Adapter and create the new Legacy Network Adapter

  • Configure the DVD Drive to boot from Windows Server 2012 iso and Boot the Virtual Machine..
  • After Boot and start the Windows Server Setup Wizard click Next.

  • Click Repair your Computer.

  • Select Troubleshoot.

  • Select Command Prompt.

  • If you type ipconfig you will not get nothing.

  • So type start /w wpeinit

  • After that type the following command to give static ip address
    netsh interface ip set address static <ipaddress> <subnet mask> <gateway>.
    In this scenario you don't need to give <gateway>.

  • Now ping one of your servers in LAN to verify that you have access in network.
  • Type Exit
  • Click again Troubleshoot
  • Click System Image Recovery.

  • Click Cancel in Error that you get and click Next.

  • Click Advance.

  • Select Search for a System Image in the Network.

  • You will get a Warning if you want to connect in the Network. Click Yes
  • Type the path of your Windows Backup and click OK.
  • Select the Location which include the Backup and click Next.

  • Select te BACKUP that you want to Restore and click Next.

  • You can find additional options of Restore Points but because will proceed with full restore leave the default options and click Next.

  • Click Finish and the Restore will start.

  • Wait unti finish the Restore

This method can use it in this scenarios when you don't have any other solution to Restore the Windows Server that you want. It's not simple but it worth it.

Have a nice weekend !!!
 

Do you use Windows Backup daily and you want something to say? SHARE IT NOW in our commented system with other IT PRO.

Powershell Tool Export Reports from Active Directory - Updated Version

$
0
0

Another one version of our Tool. The new Version include and Reports for Users. 

It's very easy and you don't need to be expert to use the Tool.

Below i will explain how can use the new feature.

When you will open the Tool you will see a new Tab Users. Click on it and select one of the 3 options to Export Reports. If you don't select any OU then the Report will be include all the Forest.

  • Check the Select Organization Unit and check the Report that you want to Export.
  • Click browse and in the right side will open the structure of your Active Directory with all Organization Units.

  • Select the Organization Unit and clcik Export.
  • Save the file.

You can download here

That's it!!!

Quick and Simple.

Give use your feedback through our commented system or send me an email in info@askme4tech.com.


HYPER-V - How to Access Virtual Disk Properties

$
0
0

As IT Pro very often  create new Virtual Machines for Production Enviroment or for Testing. Create new Virtual Hard Disks for Virtual Machines. In Physical Servers Hard Disks are hardware equipment. But in HYPER-V Host the Virtual Hard disks are files with an extension vhd or vhdx.

Sometimes we need to know specific details for Virtual Hard Disk of a Server. How can find these details ? For Physical Hard Disks already we know all the details when we buy the Disk or we know where can find it after add in the Server.

Today i would like to expalin how can find all the necessary details of a Virtual Hard Disks in HYPER-V.

So Let's Start

Virtual Hard Disk Properties.

  • One way to find some details of Virtual Hard Disk is to open the path which located the disk and with right click in the vhd or vhdx file , select Properties.  You can see Size of the disk, attributes,  when has created but maybe it's not enough most of the times.
  • Let's create a scenario. You have create a Virtual Server but you don't remember if the Virtual Disk is Dynamic or Static. How can find this info? It's very easy but maybe you can't find it.
  • Open HYPER-V Manager
  • Select the Virtual Machine and from the right side click in Settings.

  • Click in the Hard Disk.
  • From the right side clcik in button Inspect.

  • It will open a new windows with Properties of Virtual Hard Disk
    Format, Type of Disk, Location, FileName, Current File Size and Maximum File Size.


Standalone Virtual Hard Disk Properties.

Except from the option to find Virtual Hard Disk Properties of a specific Virtual Server  HYPER-V Manager can retrieve properties of any Virtual Hard disk if it's attached or not in a Virtual Machine. 

  • Open HYPERV-Manager
  • From the right side click in Inspect Disk 

  • Select the Disk that you want to retrieve all the Properties and click Open
  • Find the properties of a Virtual Hard Disk.


When click Inspect the proceess that run in the backgroynd scan only the header data for the information. It doesn't perform any scan in data region for any corruption.

I hope to find it usefull info.

Now it's your turn to share your experience with other IT Pro in or commented system. Start now 

Have a nice weeekend

How to enable Restricted Admin Mode in Remote Desktop Connections

$
0
0

Remote Desktop is one of the favourite tool for every IT Pro and lot of times can give solutions for the simple users. But what about Security? Last years hacking , data breaches and infections with virus has increase dangerous. 

Security is challenge for every IT Pro today. This is a reason why today i decide to write this article which hasn't do with any of the topics that ususally write.

So Let's Start.

Overview

RestrictAdminMode it's a  feature of Remote Desktop in  which prevent the transmission of credentials to the remote PC while connect with Remote Desktop.

Enable RestrictAdminMode

If you would like to enable and use RestrictAdminmode in Remote Desktop first of all must enable the option in the Target Server.

If for example wants to connect remotely from your PC Iin Domain Controller must enable the RestrictAdminMode in Domain Controller and after use it from your PC.

  • Decide which servers wants to connect with RestrictAdminmode and add the following registry key
  • Login in the target server. Right click in Start Button - - > Run - - > type regedit to open Registry.

  • Browse to HKEY_LOCAL_MACHINE\System\CurrentControlSet\Control\Lsa 
  • Create new DWORD Value with Name DisableRestrictedAdmin. The Value will be 0.

  • You don't need to Restart the Server. Just Log Off 
  • From the PC that you want to use Remote Desktop run the following command.
  • Right click in Start Button - - > Run and type Mstsc.exe /RestrictedAdmin

  • Connect in the Server that you have enable RestrictAdminMode.
  • You will observe that didn't ask for credentials while try to connect in the Server.
  • Now from the Server that you have connect Remotely try to open a network resource from another Server.
  • For example right click in Start Button and Select Computer Management.
  • Right click in Computer Management and Select Connect to Another Computer.

  • Type the computername that you want to connect.
  • After connect try to open the Services and you will see an Access Denied.

  • This happened because you have enable RestrectAdminMode and don't have access in any other  network Resource.
  • Or Try from Server Manager to Add another Server from All Servers. You can't.


Disable RestrictAdminMode

If you would like to Disable RestrictAdminMode open the Regedit and change the Value of DisableRestrictedAdmin from 0 to 1

  • Click in Start Button - - > Run - - > type regedit to open Registry.

  • Browse to HKEY_LOCAL_MACHINE\System\CurrentControlSet\Control\Lsa 
  • Change the Value of DisableRestrictedAdmin from 0 to 1


It's very simple and you can use it if feel that need more security in the importance Area of your Network. 

Now it's your turn to explain if you have use this option or if it's the first time that you hear it through our commented system

Have a nice weekend !!!

How to use differencing Disks in HYPER-V

$
0
0

Differencing Disk is good solution to save hard disk space in your HYPER-V Host when you must deploy multiple Virtual Machines in your environment for test purposes. Of course you can use it in your production environment but you must sure that the Parent Hard disk located in Disk with high performance like SSD because the I/O will be high. 

Differencing Disks can reduce the time and storage requirements but if you use lot of child disks can be a performance hit.  So think very carefully where and why must use Difference disks in your environment.

What is differencing disk

A differencing disk is a virtual hard disk (vhd) or VHDX which store changes made to another vhd or to guest operating system. A differencing disk associated with another disk. So when must be create a differencing disk the associated disk must be created first. The virtual hard disk is called parent disk and the differencing disk called child disk.

The differencing disk expands dynamically and can grow as large as the maximum size allocated for the parent disk.

Except from the storage requirement which is a big advantage differencing disk can use it to isolate changes and reverse them.

With a simple words you can create one parent disk with OS including patches,updates and any software that you want and base on the parent disk you can create child disk for every VM that will keep only the changes between the parent -< - >child disk. Below i will try to visualize what i am say.

Below i will explain how can create and use the differencing disk. 

So let's start.

Create new Virtual Machine

First of all you we must create a new Virtual Machine in HYPER-V and install the OS , patches, updates and any software that you want. For the scenario i will install only the Windows OS with the latest patches and updates.

Find instructions in the article how can create the new Virtual Machine

Create Virtual Machine in Windows 8.1 with HYPER-V

After finish with the create of the new Virtual Machine must do the Virtual Hard Disk Read Only because if the parent hard disk modified from any process or anything else then all Differencing hard disks related to this parent disk will become invalid.

  • Open the path whitch located the Virtual Hard disk
  • Right Click in the virtual hard disk. Select Properties and check the Read Only. Click OK.

Run Sysprep in Virtual Machine

After have create the new Virtual Machine and have finish with all the installations now it's time to run sysprep. We will run Sysprep to generalize the Virtual Machine and use the VHD or VHDX to create multiples Virtual Machines.

Because we have to do with Virtual Machines you can use Sysprep with the switch /mode:vm. This command can apply after Windows 8.1 and Windows Server 2012. It's a new command and you can't use it before Windows Server 2012 or 8.1.

Find the article with the instruction how can proceed to run Sysprep /mode:vm

Windows Sysprep Tool for Virtual Machines


Create new Differencing Disk

After Sysprep run successful now it's time to create a new virtual hard disk as differencing.

  • Open Hyperv Manager
  • From the right side select New ---> Hard Disk
  • In the first screen Click Next​

  • Select the Disk Format VHD or VHDX. For the scenario we proceed with VHDX. Click Next. But the Disk Format must be the same as the parent hard disk which create before with the Virtual Machine in Create new Virtual Machine.

  • The Disk type that must be select is Differencing.

  • Write the name that you want to have the virtual hard disk. I change the name to child1. Select the path that will save the hard disk.Click Next.

  • Browse and find the parent hard disk that we create in  first step Create new Virtual Machine. Click Next.

  • Just a Summary. Click Finish to create the new Virtual Hard Disk.


Create new Virtual Machine to use the Differencing Disk.

We have create the Differencing hard disk. Now it's time to create the new Virtual Machine.

  • Open Hyperv Manager
  • From the right side select New ---> Virtual Machine
  • In the first screen Click Next.

  • Give a name for the Virtual Machine and select where will save it. Click Next.

  • Select the Generation. You will select the same Generation that have select in the beginning when create the new Virtual Machine with the parent hard disk. Click Next.

  • Give Memory of your Virtual Machine. For now 2 GB is ok.

  • Select the Virtual Switch to use the specific Virtual Machine. I select Not Connected for Now. Click Next

  • Select Use an existing Virtual Hard Disk and find the Differencing disk which created before. Click Next.

  • Just a Summary. Click Finish to create the New Virtual Machine.

  • Start the new Virtual Machine to check if all workings well.


Differencing hard disks can make your VM deployment less tedious and repetitive and it's a very good solution when you want to isolate changes and reverse them quickly. Can reduce lot of time, lot of storage requirements but you must very careful when will take the decision to use it in your production environment because parent disk can be a bottleneck of your Virtual Machines. The best solution is to use SAS Disks for the parent disk to avoid performance issues.

I hope to find interesting my article.

Now it's your turn to tell us what is your experience with Differencing Disks or give a try and come back with your feedback in our commented system.

Have a nice weekend.


How to use PowerShell to migrate mailboxes from one database to another in Exchange 2013

$
0
0

Migrating Exchange mailboxes between databases is not your every-day task, and administrators can therefore find themselves spending an inordinate amount of time troubleshooting or re-distributing mailboxes across the databases. In this article, we will show you how to move mailboxes from one database to another in Exchange 2013 using the Exchange PowerShell. Following these steps should hopefully allow you to spend less time and make fewer mistakes when it comes to doing this task yourself.

Step 1 - Get the Mailbox Names

Open the Exchange Management Shell. Determine the names of the databases so that they can be simply copied to the move mailbox command.

Get-MailboxDatabase

Get-Mailbox -Database Mailbox Database 2242144626 -ResultSize Unlimited | New-MoveRequest -TargetDatabase Mailbox Database 1063240071

Step 2 - Move the User Mailboxes

After you run the New Move Request command, the mailboxes will be queued. This may take some time depending on the number of mailboxes involved. 

Step 3 - Check the Progress of the User Mailbox Migration

The following command must be run to check the progress of the migration. The below image shows a completed mailbox move. The last column shows the percentage of completion, which in this case is 100.

Get-MoveRequestStatistics -MoveRequestQueue Mailbox Database 10632440071

Step 4 - Remove the Mailbox Move Request

After the mailbox move request is complete and all the mailboxes have been moved, run the following command to remove the mailbox move requests.

Get-MoveRequest | where {$_.status -eq “Completed”} | Remove-MoveRequest

Step 5 - Arbitration and Archive Mailboxes

Even after the user mailboxes have been migrated, there may still be Archive and Arbitration mailboxes in your database that you also want to move. Run the following commands to locate these mailboxes in your database:

Get-Mailbox -Database Mailbox Database 2242144626 –Arbitration

Get-Mailbox -Database Mailbox Database 2242144626 –Archive

Running these commands will show the names of the arbitration and archive mailboxes in your database. If there are any such mailboxes, you can run the following commands to move them to the new database:

Get-Mailbox -Database Mailbox Database 2242144626  -Arbitration | New-MoveRequest -TargetDatabase Mailbox Database 1063240071

Get-Mailbox -Database Mailbox Database 2242144626 -Archive | New-MoveRequest -TargetDatabase Mailbox Database 1063240071

To monitor the progress of the mailbox move, use the following command:

Get-MoveRequestStatistics -MoveRequestQueue Mailbox Database 10632440071

After all the mailboxes have been moved, you can use the following command to clean up the mailbox move requests.

Get-MoveRequest | where {$_.status -eq “Completed”} | Remove-MoveRequest

You can then use the Get-MoveRequest command to ensure that all move requests have been cleared before you run a new one. 

Conclusion
Before you attempt to move mailboxes from one database to another in Exchange 2013 it would be wise to go over the steps laid out in this article in detail. Without an in-depth knowledge of the process, the migration can tend to be time consuming. If you’re looking for an altogether quicker and simpler method, LepideMigrator for Exchange has proven to be both a powerful and cost-effective way of migrating mailboxes in Exchange 2013.

Inject Drivers for better management in MDT 2013

$
0
0

In previous articles i wrote for Microsoft Deployment Toolkit (MDT) and how can add drivers or Capture an Image. These methods can help to reduce time and automate your tasks for better productivity. But few months ago i came an across with a problem that to be honest i didn't have realize it.

As IT Pro most of the times you have different hardware models of Workstations,Laptop , Servers from the same Vendor or different. 

When you create a new Task Sequence for the Deployment that you want to proceed how sure are you that the Deployment use the right Drivers for your specific model that you want to Deploy the OS? 

Today i would like to describe how can use Inject Drivers during deployment with  MDT 2013 to have the full control of your Drivers and what you are doing.

Before start to read this article at least must already read and understand the following articles. Unless it's sure that you have lot of problems that maybe can't be resolve.

Building a Custom Windows ISO with MDT 2013

How to add drivers in Windows ISO with MDT 2013


So let's start from the begining.

Import the Windows OS in MDT 2013

Find all the details from the article in the section Import Setup Files of Windows 

Building a Custom Windows ISO with MDT 2013


Import the Drivers in MDT 2013

Identify your Laptop/Workstation Model and import the drivers in MDT 2013. Find all the details in the following article.

How to add drivers in Windows ISO with MDT 2013


Create New Task Sequence.

After import the Windows OS and add drivers we must create the Task Sequence for the Deployment. Here are the major changes that must done with the Drivers.

You can find all the details in the article Building a Custom Windows ISO with MDT 2013 as describe above but i prefer to show you these task.

  • Expand the Deployment Shares and the MDT Deployment Share.
  • Right Click in Task Sequence, select New Task Sequence.
  • Fill the Task SequenceID and TaskSequenceName (names that you can identify in the future) , click Next.

  • Select Standard Client Task Sequence.

  • Select the OS which created before

  • You can specify a product key now or leave it as it to activate the Windows after the installation

  • Fill the Organization with a name.

  • Specify the local Admin Password if you want or select Don't specify an Administrator password at this Time

  • Here is a Summary only , click Next

  • Click Finish


Create new Selection Profile

Now it's time to create the Profile that will be use for the Media in the next step.

  • Expand the Deployment Shares , MDT Deployment Share and Advanced Configuration
  • Right Click in Selection Profiles, select New Selection Profile
  • Type the name of Selection Profile and click Next.

  • Expand and tick the the folder of Operating SystemOut of Box Drivers and Task Sequence  which Import in previous steps. Click Next.

  • Just a Summary of your Configuration. Click Next

  • Wait to finish and click Finish

Inject Drivers in Task Sequence

After create the new Task Sequence and Selection Profile then we must configure Inject Drivers action to use the specific Selection Profile.

  • Expand the Deployment Shares and the MDT Deployment Share.
  • Click in Task Sequences , from the right side right click in the Task Sequence that create before and select Properties.

  • Click in Tab Task Sequence.
  • Expand the Preinstall. Click in Inject Drivers.

  • From the right side select the Selection Profile that created before to use the specific Drivers for the specific Deployment.
  • Click OK.


With this method you can have a full control of your Drivers and where must be Deploy. It's not complex if you have a basic knowledge how can create a Deployment in MDT.

Now it's your turn. I am sure that most of then in the Task Sequence - - Inject Drivers the Selected Profile is All Drivers. Write your comments in our commented system and share it with other IT Pro

Have a nice weekend !!

Disable Server Manager at Start up for all Users

$
0
0

This is my first artile for 2017 and will not be related with any of the Categories that use to write like MDT,Virtualization or Powershell. Today i prefer to write a How To Article whch epxplain how can disable Server Manager to start when Login in Servers  administrators or other users as Remote Desktop Users.

Maybe some IT Pro prefer to open automatic the Server Manager when login but when use Remote Desktop Server it's not the best option to open Server Manager when a user Login.


Disable Server Manager at Start up

I don't like it every time that login in Server to start the Server Manager. I ignore it most of the times but it's better to know how can  disable it once and finish.

  • Login in the Server and will open the Server Manager.
  • From the top of the right side click in Manage - - - > Server Manager Properties.

  • Check the Don't start Server Manager automatically at logon. Click OK.

Log off and next time that you will Login in specific Server you will see that Server Manger sote started.


Disable Server Manager from Start up for multiple users.

All good until now. You have disable Server Manager at Start up.But what about if you are not alone in the IT Department or mulitple users connect in the Specific Server because it's a Remote Desktop Server?

The above instruction Disable Server Manager only for the login user. If another user login then must do the configuration again.

When use Remote Desktop Server users you don't want to has access in Server Manager.

But also users they don't want to bother from a Console that they don't know what it is.

Let's explain hw can disable it.

  • Open Group Policy Manager and create new Policy.
  • Expand the Computer Configuration\Administrative Templates\System\Server Manager.
  • From the right side open the Don't display Server Manamger automatically at Logon and select Enable.

  • Link the Group Policy in the Organization Unit with the Servers that you want to Apply or use the Security Filtering to Filter the Servers that you want to apply.
  • Test one Server with gpupdate /force if the Group Policy applied.

That't it. Easy and simple.

I hope to find usefull this small Article and to apply it if you don't want Server Manager every time to open it when login in Server.

Have a nice weekend!!

Vembu BDR Review -Installing and Configure Backups

$
0
0

Today downtime of a Production Server maybe catastrophic in company for lot of reasons.

IT Pro must has deploy good Backup software with the right design base on the requirements of the company to reduce or eliminate downtimes in any scenario. Must be ready to face any Failover Scenario or Disaster Recovery Site Scenario at minimum time.

To accomplish this must be doing tests every x months in Restore or Failover Process of different Servers and documented all the process step by step and any issue that maybe face during Restore.

But except tests it's very important as i say before to have select the right Backup Software. 

I like to test different Backup & Replication Softwares and share in IT Community to help understand which software can cover his requirements. 

Introduction

In the market you can find lot of Backup Softwares. But which is the right software that you can cover all your requirements as IT Pro? You must answer a lot of questions before decide. Like Backup Software can cover Replication, Failover Solution or Instant Recovery?  As IT Pro i would like to work with different applications to give me better experience which is the product that can cover the requirements base in the environment that work.

Recently i was asked to do a Review for Vembu BDR Suite. To be honest i didn't hear before for the Vembu Technologies but after a conversation with Vembu i realize that Vembu BDR Suite can be a very good solution for Backup and Disaster Recovery. 

So i download Vembu BDR Suite from here  to start use it and see what can do.

Before proceed with my review one feature that really impressive me is that can restore a Virtual Machine from VMware to Hyper-V or opposite. I didn't find yet this feature in any other Backup Software.


System Requirements

Before start the installation i would like to write down System Requirements that need for the Vembu BDR Backup Server

OS 

Microsoft Windows Server 2012 R2
Microsoft Windows Server 2008 R2
Microsoft Windows Server 2012
Linux Ubuntu LTS 12.04
Linux Ubuntu LTS 14.04

Instant Boot Infrastructure

VMware vSphere
Microsoft Hyper-V
KVM Hypervisor

Memory                                                                                                        

8 GB

CPU

Quad Core Xenon Processor

Meta Data Storage

10% of the planned total backup data size

Network Card

1 Gbps & above

Browser

IE v11
Firefox v28 & above
Chrome v34 & above

Installation

The installation process it's very easy and you don't need to be advance user to complete. 

First of all you must Download the trial Version from https://www.vembu.com/vembu-bdr-suite-download/  that you can test for 30 days before purchase.

  • Click Next in first Welcome Screen.

  •  Accept the agreement and click Next.

  • To proceed with the installation must check all of them and click Next. Vembu use MySQL and MongoDB in background.

  • You can check the Configuration Settings and you can change it. But it's recommended to change any default settings only if already use a specific Port. If you don't just click Next.

  • You will get an alert that will start the installation of Vembu , MySQL and MongoDB. Click Yes.

  • Wait until finish the installation and click Finish to Start Vembu BDR Server and open the Web Console.
  • After that you will see a new icon of Vembu BDR Server in the right side of Task Bar that you can start , stop , restart the Service of Vembu BDR Server, open the Web Console. 

  • If the Web Console will not open after finish the installation you can go from the icon of Vembu BDR Server in the right side of Taskbar , right click and select Vembu BDR Server Web Console.
  • For the first time it will ask for Time Zone. Find your Time Zone and click Save.
  • Type a unique name for your Vembu BDR Server. Click Update
  • You will see the first Welcome Console to start Configure Backup Tasks of your VM's or Physical Machines.


Create and Run Jobs for VMware/Esxi Servers

Now it's time to add a VMware vCenter Server and backup any of the VM that you want. But before start let's go deeper. Vembu BDR use VMware vSphere Storage APIs technology to take backups of the VM's in VMware.  VMware vSphere Storage APIs use it from Vembu BDR to take backup a VM without need to install any agent in Virtual Machine and without requiring backup processing to be done inside each guest virtual machine on the ESX host. If you want to learn more for VMware vSphere Storage APIs open VMware vSphere Storage APIs – Data Protection from VMware Website.

Now Let;s Start

  • Click in Add VMware Vsphere Server.

  • Just Click Next. You don't have any other option.

  • Type the vSphere Credentials and click Save.

  • Find the Server List with your Server and all the options that you have from here.

Now it's time to proceed and create a new Backup Job for the VM's in Vphere Server. 

  • Click in icon Backup Now .

  • Find and select the VM's that you want to proceed with Backup.Click Next.
  • Schedule the Backup Job how often you want to run. I will schedule it for 9:00 P.M every day. Click Next.

  • Select the Restore Points that you want keep. Restore Points can be configure base on your Backup Policy that you have in your Company. For now add only 3 Recovery Points.
  • In this Step as you can see include 2 More Buttons. Application Aware Option and Additional Full Backups.


Application Aware Option 

In Application Aware Options can use Application Aware process for application aware backup to ensure skipping of applications in a non-consistent state. If takes backup Domain Controller, Exchange Server , SQL Server then Application Aware Process ensure that no unfinished database transactions or incomplete application files when create the VM snapshot and start copying to the target.

Check the Application Aware Process to enable it and click Save.

Additional Full Backups

This option is very useful when you want to keep Monthly,Weekly ,Yearly Backups.

You can enable the option to achieve the followings

  1. Schedule when you want to take Full Backup except from the already one that have configure it.
  2. How many Full Backups you want to keep it.

  • Decide if you want any of these 2 options and click Next.
  • Type the Backup Job Name. Check the Run this Backup immediately after saving this configuration if you want to start the Backup after save it. Click Save the Backup.

  • Now you can see the Job that you have create or click in Backup - - > List Jobs.
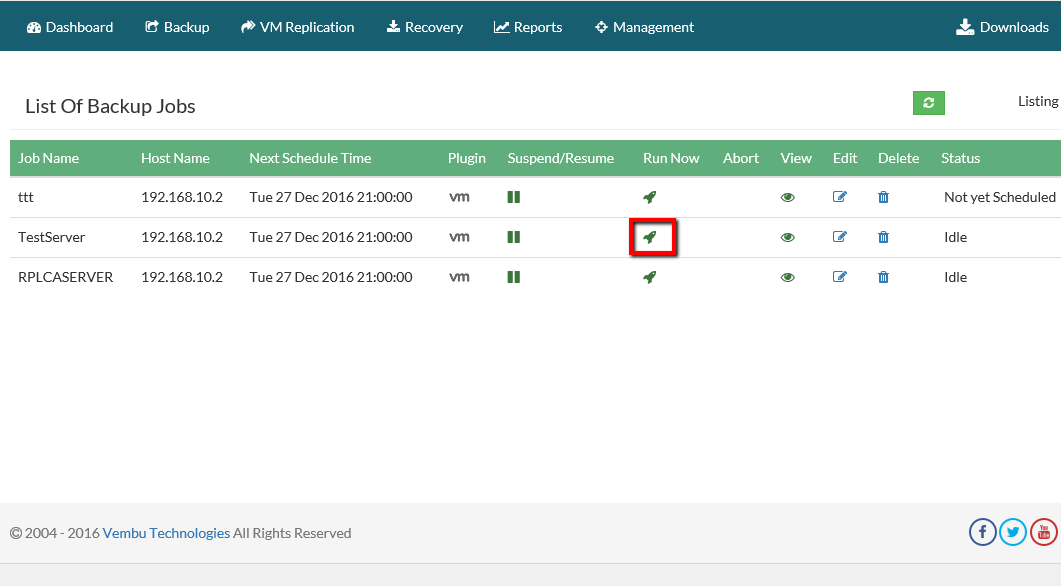
  • If you want to run manual the Job click in Backup Now icon.

  • When the Backup started click in Status icon to open a new Windows and monitoring the progress of your Backup.


Create and Run Jobs for HYPER-V Servers

Except from VMware,Esxi Backup Vembu BDR can cover Backup in Hyper-v Hosts. Vembu BDR use CBT (Changed Block Tracking) Technology for Incremental Backups. What is CBT with simple words? Is a file system filter driver which tracks the changed data blocks of Hyper-V VMs in between the incremental backup schedules. So HYPER-V Backups completes in minutes because transfers the modified incremental data blocks rather than the complete differential data from last successful full backup. 

If you would like to read more details of Vembu CBT you can open https://www.vembu.com/hyper-v-incremental-backup/

The process is similar as in Create and Run Jobs for Esxi Servers Servers but i would like to explain from the beginning the process and how can use Vembu BDR for HYPER-V Server.

  • Click from Menu Backup  - - > Microsoft HYPER-V.

  • Click Add HYPER-V Server.

  • Select Server Type. You have 2 options Standalone Hyper-v Host or SMB Host. Today will use Standalone Hyper-v Host.

  • Type the credentials to connect in the Hyper-v Server. Note that if you are in Domain then change the Log on of the BDR Service with the Domain Admin credentials to has access in the HYPER-V Server instead of local account that run by default.

  • Click Next to install the VembuIntegrationService that need for connectivity between Vembu BDR and HYPER-V.

  • If the installation finish successful you will see the Hyper-v Server in the List.
  • Click in Backup now icon or Select from Menu Backup - - -> Microsoft HYPER-V and click in Backup now icon

  • Select the VM that you want to backup.

  • Configure the Schedule Time that you would like to run.

  • Decide how many Restore Points you would like to keep. I will keep 3 Restore Points for now.
  • In this Step as you can see include 2 More Buttons. Application Aware Option and Additional Full Backups. Find all the details in Create and Run Jobs for Esxi Servers Servers

  • Type the Backup Job Name. Check the Run this Backup immediately after saving this configuration if you want to start the Backup after save it. Click Save the Backup.

Here we finish with the Backup Task of VM from Hyper-v Host. As you can see it's very easy without need to have advance knowledge to configure it.

After try Vembu BDR for Backup in Esxi and HYPERV enviroment i found it a very good tool for your Backup Solution. It\s very easy in installation and the user interface very simple.

I know that i didn't cover all the features like an Restore , Replication, Offsite Copy Management or a Mailbox Restore from Exchange Server. But be sure that i will come back to cover more features that can give Vembu BDR to help any System Administrator or IT Pro to use the Product more efficient. 


Note that this review was sponsored by Vembu Technologies


mdata

$
0
0

Avatar

Director: James Cameron (born August 16, 1954)Science fictionTrailer

HYPER-V Management Tools to use it

$
0
0

HYPER-V has lot of free tools to manage, monitoring  or convert virtual machines. But how many hours do you spend to search for tools , test it and use it ? 

So today i would like to share in all IT Pro some of free tools that can use with HYPER-V for manage,monitoring or convert Virtual Macines. It very quick and simle to type and search in Google for hyperv tools and publish it here but i don't want it.

These tools i have use it in my day to day tasks of work or in my Lab Enviroment for tests.

Let's start.


Remote Server Administration Tools for HYPER-V

Remote Server Administration Tools (RSAT) enables IT administrators to remotely manage roles and features in Windows Server 2012 R2, Windows Server 2012, Windows Server 2008, and Windows Server 2008 R2 from a computer that is running Windows 10, Windows 8.1, Windows 8, Windows 7.

RSAT include and HYPER-V Manager that can enable to use it from your Windows Workstations. Just to note that you must have the same version of OS to connect remotely in HYPER-V Role of a Server. For example if you have Windows Server 2012 you can manage remotely HYPER-V with Windows 8.1 or Windows 7. You can't manage HYPER-V Role from Windows 10 in Windows Server 2012.


DISK2VHD

 
Sysinternal tool  that can creates VHD versions of physical disks for use in Microsoft Hyper-V virtual machines (VMs). The difference between Disk2vhd and other physical-to-virtual tools is that you can run Disk2vhd on a system that’s online


MVMC

Microsoft Virtual Machine Converter (MVMC) is a Microsoft-supported, stand-alone Application for the information technology (IT) pro or solution provider who wants to Convert virtual machines and disks from VMware hosts to Hyper-V hosts and Microsoft Azure or Convert physical machines and disks to Hyper-V hosts.


RAMMAP

 
Another one Sysinternal tool that can use it understanding of the way Windows manages memory, to analyze application memory usage, or to answer specific questions about how RAM is being allocated. Very usefull tool when use lot of Virtual Machines.


V2V Easy Converter

 
5nine V2V Easy Converter it's a free tool that provides fast and easy migration of VMware virtual machines to Hyper-V. It performs non-intrusive conversions with the highest success ratio on the market. You can use it in any case that you want to convert a virtual machine from ESXi to HYPER-V.
I have use it lot of times without any problem.


Startwind V2V Converter

Another one Convertions Tool that allows the conversion of VMs from one format to another, basically “cloning” them and keeping the original file intact. The difference with V2V Easy Converter is that can use it to convert Vmware to HYPER-V or opposite.


Veem One Free Edition

Veeam ONE is a powerful monitoring, reporting and capacity planning tool for the Veeam backup infrastructure. You can monitoring Microsoft Hyper-V enviroment and  helps to enable Availability by providing complete visibility of the IT environmen to detect issues before operational impact.

It's very usefull tool if you would liek to have a full imag eof Hyper-v enviroment.  


Intel® Processor Identification Utility - Windows* Version

It's a tool from Intel  that can run it to identify if your Intel Processor support Virtualization Technology. I fyou have a Physical Server and you want to use it as Hyper-v Host but you aren't sure if can support it download and run this tool to identify if can suppor or not.


AMD Virtualization™ Technology and Microsoft® Hyper-V™ System Compatibility Check Utility

It's a tool from AMD that can run it to identify if your AMD Processor support Virtualization Technology. If you have a Physical Server and you want to use it as Hyper-v Host but you aren't sure if can support it download and run this tool to identify if can supporT or not the Virtualization Technology.


These some of the tools that can help you to manage , monitoring or do conversions for yoru HYPER-V. I will try to keep it up to date and add onnly tools periodically that i have use it.

If you have to recommend any tool that you have use it in your HYPER-V Enviroment you can share it in our commented system and add in this list.

Have a nice weekend !!


How to Restore VM or Files with Vembu BDR

$
0
0

Before 2 weeks i publish a Review related to Vembu BDR and how can install,configure the Server to take Backups of your Virtual Machines from VMWare or HYPER-V. After lot of tests, I realize that Vembu BDR is a good tool for your Backups in your DataCenter.

But wha about Restore of your Virtual Machine? It's a very important process because your Backup is useless if you can't Restore it or take hours to Restore your Virtual Machine. 

After finish my test of Vembu BDR  for Backup Tasks and leave it to take Backups days i start to check how it works the Restore Task of the Vembu BDR. What features has and which are times that need to Restore a Virtual Machine?

Let's start to explore it.


Restore Backup Methods- Esxi Server or HYPER-V Host

You have configure the Backup Jobs. All the Jobs run base on schedule time and finish Successful. But what about Restore of Virtual Machines or specific Files and Folders?

Now it's time to see how Restore Options works in Vembu BDR Server.

  • Click Recovery from Menu.
  • You will see all the Backup Jobs that has run until now.
  • Click in Restore Icon to open the Wizard for the Restore Process.

  • Here you can see all Restore Types that you can use.

Let's go to explain one by one how can use it base on your Requirements.

Instant VM Recovery

To reduce downtime in any disaster scenario you can use Instant VM Recovery method to Restore the Virtual Machine direct from Backup. The specific method needs only 5 minutes until VM will up and running. It's amazing that you will have your Production Server to work in 5 minutes. After that you will continue to create your new Server that need to replace it with the Instant Backup when will be ready.

  • Select Instant VM Recovery. Click Next.
  • Select the Restore Point. Click Next.

  • Select the Server that you want to Restore. Click Next.

  • Here Vembu BDR has a very interesting approach that i don't have see it in any other Backup Software. You have the ability to Restore VM in Esxi or HYPER-V. It doesn't matter from where take the backup of VM. For now select  VMware. Click Next

  • Select the Server. Select the Esxi Host if you have more than one. Select the Datatstore that you want to save the VM. Type the VM Name and click Next.

  • Accept the NFS License that will use.

  • Just a Review of all the configuration in the Task.
  • Click Next to Start the Instant VM Restore.

  • Believe it will not take more than 5 minutes and the VM will Up.
  • If you will see from Vsphere Client you will find a new VM with similar Name.


Live Recovery To Esxi Server

This type of Restore is the normal method that all we know. You can restore the VM from the Backup in Esxi Host.

  • Select Live Recovery To Esxi Server. Click Next

  • Select the Restore Point. Click Next.

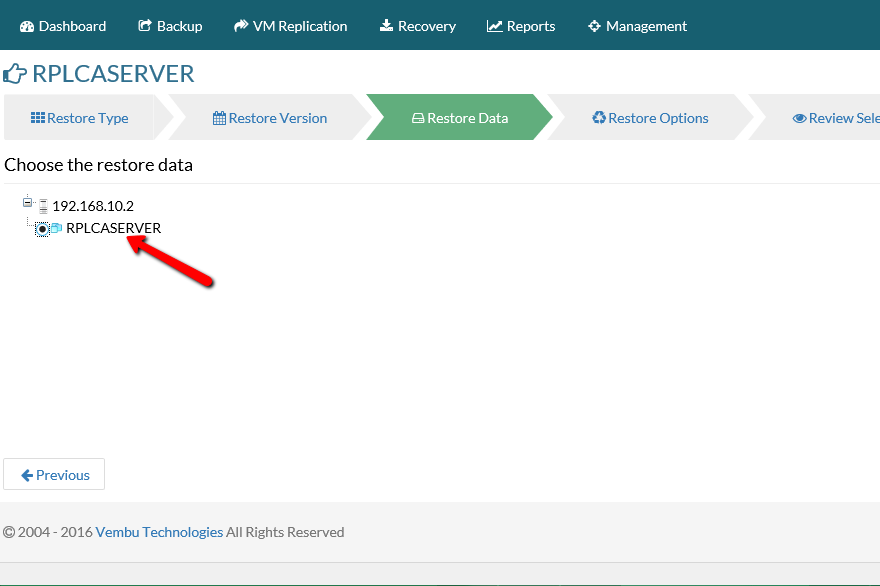
  • Select the Server that you want to Restore. If you have multiple partitions you can choose any of them or all of them to Restore.Click Next.

  • Select vCenter Restore.
  • Select the Host Name, Datastore and VM Name of the Restore VM .Click Next.

  • Just a Review of the Restore Configuration. Click Next to start the Restore Process.

  • Wait until finish the Restore and connect in Vsphere Client to find and start the VM.

File Level  Recovery

Use this Restore type if you want to Restore specific files or folders of the VM. Another interesting way that use Vembu to Restore files or folders

When install Vembu BDR Server by default create a Virtual Drive (Vembuvirtualdrive) with 1 GB space as additional Hard drive. When you want to restore specific files and folders you can mount the VM from Backup and data will be listed in the Virtual drive. The most important is that it's not take space of your Hard drive. 

All these can be happened thanks to the Vembu file system that has create and called as Vembu HIVE. With simple words Vembu HIVE can expose every incremental backup as full backup. This means that don't need to merge all the changes from a previous backups and the restore will be faster.

Also with Vembu HIVE backups get exposed as VHD,VHDX,VMDK,IMG at the same time in Vembu Virtual Drive. Remember that the VembuVirtualDrive take only 1 GB and can expose all these types of backup files to restore it.

If you find interesting Vembu HIVE you can find more detais in https://www.vembu.com/why-vembuhive-whitepaper/

So let's start to explain how can restore files or folders instead of full VM.

  • Click in Recovery from Menu.
  • Click in Mount Icon. Click OK in Warning message.

  • Now you have Mount the VM in Virtual Drive that has create the Vembu BDR Server  from the installation.
  • Login in Vembu BDR Server.
  • Right click in Start and select Disk Management.
  • Click in Actions and select Attach VHD.

  • Click Browse ,open the Vembu Virtual Drive and all subfolders until find multiple folders as IMG, VHD,VHDX ...

  • Open the VHD or VHDX base on the Virtual Hard Disk type of the VM and select the Restore Point that you want.

  • Now you will see a new Disk in Disk Management. Right click in Disk and select Online.

  • When the VHD or VHDX bring online you can go in MY PC and find the appropriate Disk to restore any file or folder.


Disk Level Recovery

Use this Restore type if you would like to Restore only specific Hard disk of your Virtual Machine instead of Restore full VM. 

  • Select Disk Level Recovery. Click Next.

  • Select the Restore Point. Click Next.

  • Select the Server. Select the Disk that you want to Restore.Of course you can select only the disk than you want if you have multiple partitions. Click Next.

  • Select vCenter Restore.
  • Select the Host Name, Datastore and VM Name that you want to Restore the Hard Disk.Click Next.

  • You will get a Notice that the VM must  be power off before start the Restore Process. Click OK if you are ready.

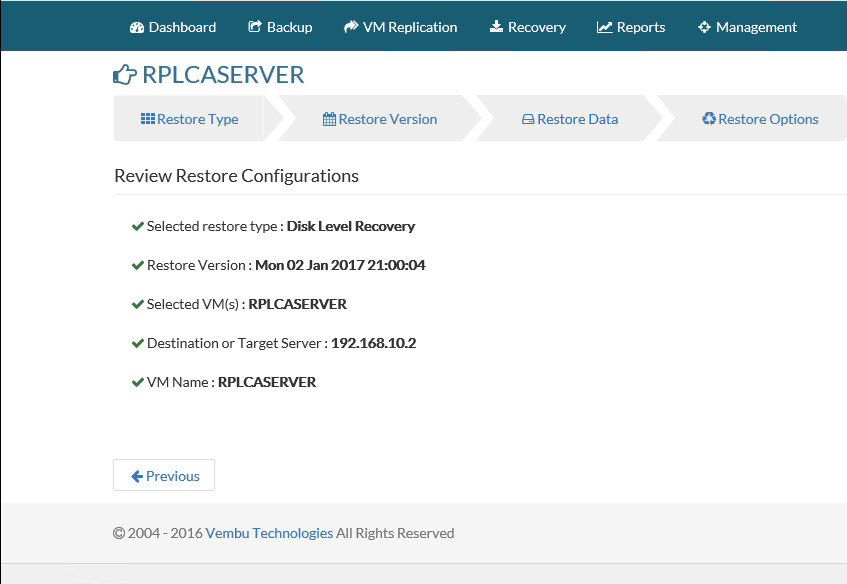
  • Just a Review of the Restore Configuration. Click Next to start the Restore Process.Click Next

  • Another one notice to confirm and start the Restore.


  • Wait until finish the Restore and verify that has complete successful the Disk in the VM.

Download

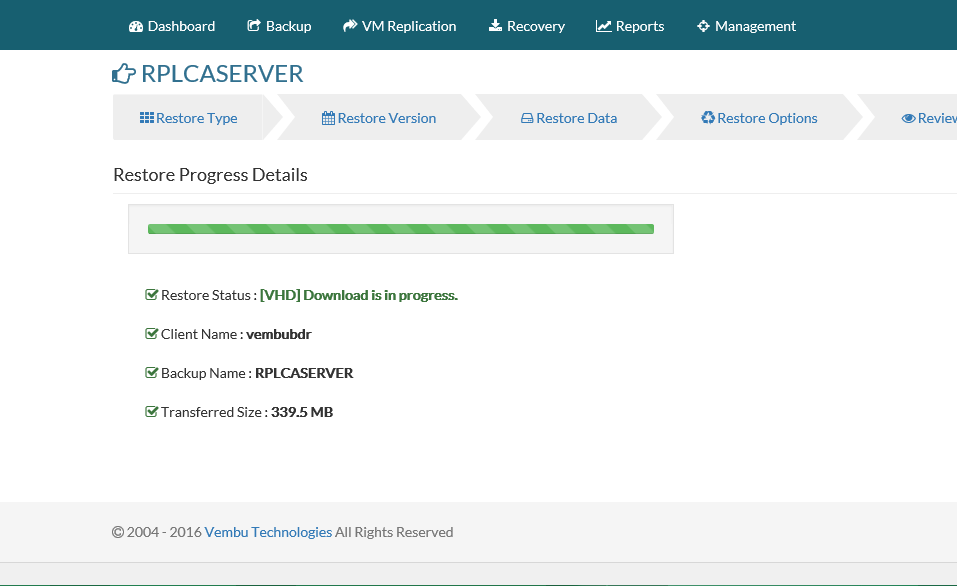
Use this Restore type if you would like to Download the Full VM in different file formats in specific path to use it in any other Host or as you want.  For example if you have Esxi Server and you want to use the specific VM in HYPERV you can download as VHD format. I like this approach that Vembu has use in different types of Restore because it's not limit your choices.

  • Select Download. Click Next

  • Select the Restore Point. Click Next.

  • Select the Server.Click Next.

  • Find the path that you want to Restore.Click Next.
  • Select in what file format you want to download the VM.Click Next

  • Just a Review of the Restore Configuration. Click Next to start the Restore Process.

  • Wait until download the Full VM in your Path that you have give.

I found very interesting the Vembu HIVE technology and the ability that give you to restore Virtual Machine in VMware or HYPER-V. The reason that can restore your Backup in different Virtualization Technologies without limited in specific Virtualization Technology

Right now i am in progress to check and test Replication and how it works in Vembu BDR. I will come back in few weeks with my impressions.

Share your feedbacks , experience with Vembu BDR and how it works in your enviroemtn through commented system or Google+ and Facebook Page . I will be here to take part in your discussion.


Note that this review was sponsored by Vembu Technologies

Design Disaster Recovery Solution with Vembu BDR Suite

$
0
0

Today Disaster Recovery Solution in your environment it's very important. You can avoid days of downtime in case of Disaster or have a single Server in minutes online if you have design and Implement Disaster Recovery and Failover Solution for your Servers.

Backup can quarantine that you will not loose your data but can't use it to avoid hours of downtime in case of damage in any of your Servers.

Here come's to take place Replication of your Servers out of your Company.

Vembu BDR can cover this requirement with the ability to Replicate your Servers and use technologies like Re-IP Mapping to avoid manual tasks when a Failover happened.


How can use VM Replication

Disaster Recovery Sites are base on Replication of VM's. So it's very important and it is a MUST for every company.

Before purchase Backup Software must be check if include Replication technology. Vembu BDR Server can cover Replication between VM's in ESXi Hosts with Network Mapping and Re-IP Mapping.

What is Network Mapping and Re-IP Mapping? Let's take a look to understand how can configure Replication and understand these technologies.

Let's explain how can use it

  • Before start be sure that you had Add VMware Server of the Disaster Recovery Site.
  • It's the same process as explain in Create and Run Jobs for Esxi Servers
  • Click VM Replication - - > VMware Vsphere.

  • Click in Replicate Now of your Local Esxi Host.

  • Select the Server that you want to Replicate. Click Next.

  • Configure Schedule Time of your Replication. Recommended out of working hours.

  • Select VMware Server of the Disaster Recovery Site , DataStore and how many restore points want to keep. Click Next.

  • If the Local Network and the Disaster Recovery Network are in different Subnet then you can use Network Mapping to map the 2 different Networks. Click in search icon for every Site to select the appropriate Network.

  • Re-Ip Mapping can be very useful in Failover Scenario. If a re-IP rule applies, the VM replica will get a new IP address according to the new network mask, and you will be able to reach this VM replica in the DR site. 
    If you don't enable this settings and the Networks of Production and DR Site are different then will not possible to use a Failover scenario and Users to has access in the Server of DR Site.Check Network Re-Ip Mapping and Click Add Rule to configure Re-IP Mapping.

  • Here type the  Ip Address/Subnet Mask of your Production Server , Ip Address/Subnet Mask of your Server in DR Site ,Gateway and DNS Server that you must use it for connectivity between Sites. These settings must be configure base on the network structure of Production and DR Site. Talk with the Network Administrator.  
  • When you finish click Save and Next.

  • Just a Review of the Replication Configuration. Click Run Replication to create the Job. If you would like to start the Replication check the Run this backup immediately after saving this configuration.

Click Run Now icon if you want to run manual the Replication and monitoring the status from Status icon.


Interesting of Vembu BDR in Replication is that you can use Re-IP Mapping and Re-IP Rules when other Softwares with the same price can't cover this technology.

I hope to find useful the article and give you to understand how can create Replication Tasks in your Data Center out of your company.

Share your feedbacks , experience with Vembu BDR Replication and how it works in your environment through commented system or Google+ and Facebook Page . I will be here to take part in your discussion.


Note that this review was sponsored by Vembu Technologies

Compare VM before Live Migration or Import in new HYPER-V Host

$
0
0

HYPER-V Host has a feature to Import a new Virtual Machine or Live Migration between 2 different HYPER-V Hosts.

As IT Pro i would like to know if the Virtual Machine that you want to transfer is compatible in the new HYPER-V Host. Especially if the Virtual Machine is a critical System in your Production environment or a huge File Server.

I don't want to start an Import or a Live Migration and in the middle of Migration get errors that must resolve it.

But how i know if the transfer will be done successful? 

Powershell has a command Compare-VM which can use it for Incompatibilities Reports before start or through the Import or Live Migration process  in the new HYPER-V Host.

I have talk in previous Article for Compare-VMExport & Import Virtual Machine in HYPER-V with Powershell but today i would like to show you  a combination of GUI with Powershell to reduce time and avoid errors while start to Import the VM in the new HYPER-V Host.

Let's start to explain how can use it.


Configurations before use Compare-VM

  • If you start to use Compare-VM without do the configurations that need then you will get some errors.
  • Open Powershell and type
    Compare-VM -name <name of VM> -Destination host <name of destination HYPER-V Host>
  • As you can see you get an error.

  • To fix the error follow the steps in source and destination HYPER-V Host.
  • Open HYPER-V Manager
  • Click in HYPER-V Settings from the right side
  • Click in Live Migrations
  • Select use these IP Addresses for Live Migrations. Click Add and type the Ip Address of your HYPER-V Host. Click OK.
  • Now go back in Powershell and run the Command.
  • You will see that will get the Incompatibility Report.

  • Except from Incompatibilities this command create a new folder with the name of the VM in the Destination HYPER-V Host with a subfolder Planned Virtual Machine.

  • What is  Planned Virtual Machine?

It's a new future of Hyper-V WMI v2 which can use this folder when migrate a Virtual Machine to make configuration and changes prior the import process base on Taylor Brown in his article Importing VMs Utilizing The Hyper-V WMI v2 Namespace

Export VM from HYPERV-Host

You can find the Process in the following Articles which include GUI or Powershell. Export the Virtual Machines and copy the VHD or VHDX File in the Destination Folder of HYPER-V Host which included all the VHD or VHDX Files.

Export & Import Virtual Machine in HYPER-V

Export & Import Virtual Machine in HYPER-V with Powershell

The VHD or VHDX Files will use it in the following Steps.


View Report and Resolve an Incompatibility Errors

So now we have Export the Virtual Machine in a separate folder and we have copy the VHD or VHDX File in the Destination HYPER-V Host. 

Now it's time to run compare-vm and view the Incompatibility Report.

Run again the following command to get the Report

Compare-VM -name <name of VM> -Destination host <name of destination HYPER-V Host>

If you don't have any error then you can proceed with migration of your VM in new Hyper-v Host.

But if you have errors read below to see how can face it.

  • While type the command you will get a Report with few details. You can see only the error numbers.
  • Type the following commands
    $report = compare-vm -name test-pc -destinationhost hyperv2
    $report.incompatibilities | ft -wrap
  • Now you can see more details for your errors that you get.

  • So you can start to troubleshoot the errors.
  • As you can see in my own report i have few errors with numbers 21026,24000,40010.
  • The most common error is the 40010. But why this error appear?
  • Two reasons can create this error
  1. Different path of the VHD or VHDX File in the Destination Host.

If you must change the path of the VHD or VHDX file in the destination Host read the Article of Ber Anstrong Importing a VM with VHDs in Different Paths how can resolve this issue.

  1. You don't have copy VHD or VHDX File in the Destination Host.
  • In this scenario the error created because i didn't copy the VHD or VHDX Files in the Destination HYPER-V Host.
  • After copy the VHDX File in the Destination HYPER-V Host i run once the commands and as you can see i am ready to start the Import or Live Migration of the Virtual Machive because i don't have any error.

$report = compare-vm -name test-pc -destinationhost hyperv2
$report.incompatibilities | ft -wrap


Import Virtual Machine in the Destination Host

After Verify that no incompatibilities Errors exist from the Report then you are ready to proceed with the Import of Virtual machine in the Destination HYPER-V Host.

Follow the Procedure of the Article fro GUI Environment 

Export & Import Virtual Machine in HYPER-V

When has finish with the Import then go in the Folder of the Imported VM and open the Planned Virtual Machine Folder. As you can see is empty.


I found this method to Import a VM in new Destination Host very usefully because you can prevent errors prior import or Migrate.

You are sure for the Results when start a Live Migration or Import VM in new HYPER-V Host.

Now it's your turn to try it when you have a VM to transfer in new HYPER-V Host and share your experience in our commented system or in Social Media Google+  Twitter and Facebook

Viewing all 85 articles
Browse latest View live


Latest Images